
This post may contain affiliate links. I get commissions for purchases made through these links.
When my husband and I were looking for a house, I loved imagining all the things we would change from paint colors to the fire pit in the backyard. I’d always wondered why people didn’t just make all the changes they wanted. I quickly learned that owning a house, working, having kids, and a million other things make all those fun projects take a backseat.
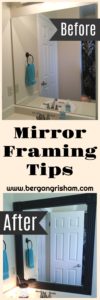
So, I was excited when I finally got around to framing the bathroom mirror. My house is 30 years old and I wanted to give it a little more of a modern look. I went to Lowe’s and looked at the baseboard and chair rail and picked one that would look good around a mirror. Then I picked the corner pieces that looked good with the boards I chose.
Here’s what you need:
My husband cut all the boards to the correct length and I checked them on the mirror with the corner pieces to make sure we measured right. Then I laid them out on two sawhorses to paint them. I got a decent first coat on them, but they definitely needed a second coat.
I started with a regular paintbrush but switched to a foam brush. The paint went on much smoother. Maybe I didn’t have the right brush originally, but I think the foam one was great for getting enough paint in all of the grooves.
After two coats I excitedly held the pieces up to my mirror to see how it looked… and quickly realized that mirrors reflect part of the back of the boards. I picked which piece of wood would go in which spot around the mirror and painted an inch or two in along the back of the inside of each piece.
You would think after that I would have realized glue would show on the back because of the reflection, but alas, I didn’t. I think I thought the glue would dry clear. At least, that’s what I’m going with. So, I can still see some white glue in the corner of the mirror. Lesson learned! Don’t put glue too close to the inner edge (and don’t put too much glue so it will squish there either).
I love the new look of my mirror! For weeks after I did it I was so excited to use that bathroom. It was the first home improvement project I did largely by myself.
Quick tips:
- Measure your mirror before you go to the store
- Make sure to buy straight wood that will sit flush on your mirror
- Work in a well-ventilated area while painting
- Have at least two foam brushes because pressing them in all the grooves can tear the foam up
- Make sure to paint along the edge of the back of the wood
- Make sure not to put glue too close to the edge
Are you planning on trying this? Or have you done it yourself? I’d love to hear (and see!) how it went.